How to Use and Test Offline Conversions from Google Ads?

So, you want to track one of the cost-efficient ways of customer interactions, which is your offline conversion.
Most businesses underestimate this metric. As a result, they can’t evaluate their overall performance or miss valuable opportunities to optimize their campaigns.
In this article, we are going to talk about how to use offline conversions and test them before importing real conversions to your Google ads platform.
Let’s get right to the first step.
Enable auto-tagging
Before starting everything else you need to enable auto-tagging, otherwise, you cannot track offline conversions.
To do that:
- Log in to your Google ads account
- In the left page menu, under Settings click Account settings
- From that page click the Auto-tagging section, then turn on Tag the URL that people click through from my ad
Create conversion actions in Google ads
Now, create conversion actions to import data from other sources or CRMs.
You can track several conversion actions depending on what you want to measure.
You can measure things like “Deal won”, “Contract signed”, “Lead qualified” etc.
Follow these steps to create conversion actions.
- From the Google ads interface, click Tools (in the upper right corner)
- Under measurement, click Conversions
- Click the blue plus sign
- Then, Import, then Other data sources or CRMs
- Click either tracking calls or clicks, then click Continue (Note: If you want to track calls from your website instead of directly from your ads, see this guide)
- Once you got to a new page, choose the Category. (You need this when segmenting them in Google ads)
- Enter a Conversion name. But, keep in mind that you should remember the exact name. Otherwise, later when you import offline conversions with a different name, it may show an error
- Put the conversion count, One (for leads) or Every (for sales)
- Click through conversion window by default is 90 days, which means your products should have a sales cycle of fewer than 90 days (if your product click to conversion life cycle is more than 90 days it may not be shown in the list of conversions)
- Include in “Conversion” – check this option if you use smart bidding strategies
- Attribution model– I think here, it can stay the same as the default option, which is the Last click. But, you can also use the Time decay option if you want to increase the share of the initial stages of the customer journey.
- Click Create and Continue
Enable your website and lead tracking systems to capture and store the GCLID
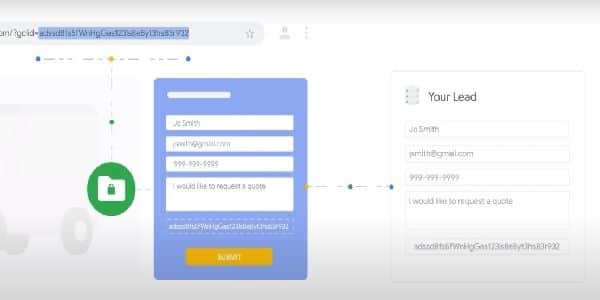
Once an ad is clicked, it generates with it a unique Google click id or GCLID, which is a 120 alphanumeric character, appended to the URL of the website.
Your website should extract and store that Id. And whenever someone submits a lead form, it should pass that GCLID to the hidden side of the form then ultimately along with the client’s other information to your CRM system.
Let’s see them step by step.
First, you need to create a hidden GCLID field for every form submission page.
Here is an example of code by Google to add to your form fields.

Second, add JavaScript code to capture the GCLID value and store it on your website.
If you want, you can write your own scripts. But, here is the one provided by Google.
This JavaScript code should be placed on every page of your website, so you don’t have to remember later which pages contains this code.
The best practice is using Google tag manager because with it, you can add tags to all of your webpages with a click of a button.
Now, we suppose you have also configured your Customer relationship management (CRM) system. So, you should be able to send data to your CRM system like customer information and GCLID value.
But, to confirm that we need to make some tests.
How to test offline conversions from Google ads?
So, you created an offline conversion tracking system. Now, you want to check if it is really working.
Here, you can learn how to test it and see some of the ways of fixing it if it is not working.
Test whether your CRM system can capture the GCLID along with lead information
Let’s check whether the stored Google click id (GCLID) value on every page passes to a lead form and eventually goes to your CRM system.
To do that, open any browser and manually append the GCLID testing value to the URL of any page of your website.
Write it as descriptive as possible like “glclid=crmtestlead”.

Then hit Enter.
Now, go to your homepage or landing page and try to submit a test lead form. Once, you submit it, you need to immediately see that information has been sent to your CRM system.
In this way, you know your offline conversion tracking is functioning properly.
What if the offline conversion tracking is not working?
Sometimes if you test, the GCLID parameter can’t be seen on your CRM system. This might be due to the wrong implementation of scripts on your website.
You should check if these 2 types of codes added correctly to your pages:
- A customized hidden field in your form submission pages for GCLID.
- Scripts to capture and store GCLID on your website
Now, there are two ways to check those code implementations on your website.
The first option is checking every webpage source code. This option requires more time and energy to check. As you have to do it manually one by one.
The second option is using Google Tag Manager (if you have added the scripts through GTM). This makes the process so much easier because you have to check only one tag that is going through GTM to your website. See here the benefits of GTM.
Uploading offline conversions from CRM to Google ads
This is the last step of the process. You need to download all the stored data from your CRM and upload it in a spreadsheet to your Google ads account.
Where to get the spreadsheet?
- Log in to your Google ads account and go to Tools and settings
- Under Measurement, click Conversions
- In the left side menu, click Uploads
- Then, blue plus sign
- Click View template

- Here, you can see templates for Conversions from clicks and Calls (download one of the three formats)
How to fill out the template?
The template has 5 rows to fill in customer information and 1-time zone parameter.
Two of them are optional: Value and Currency type.
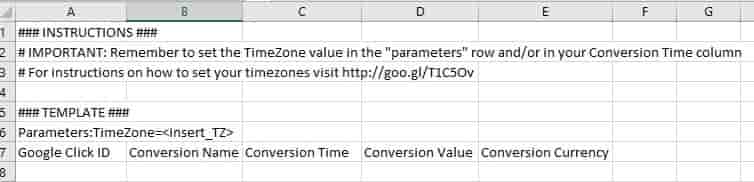
Setting up the Time zone
It is a 4-digit number with a plus or minus. Put it as Parameters: TimeZone=+0500 (depending on your time zone). Not, Parameters:TimeZone=<+0500> or Parameters:TimeZone=”+0500”
Adding Google click id (GCLID)
Don’t remove this row, otherwise, your import may fail.
Adding Conversion name
Here, add the name that exactly matches with the name you put when creating your conversion actions. If it doesn’t match, it may show an error when imported to Google ads.
Adding Conversion time
Here, you can list the time the customer interaction occurred in a certain order.
The typical format to describe the time of conversion is
Month/day/year Hour:minute:second aa 12/31/2021 5:46:12 PM
Adding conversion value (Optional)
In this field, you can enter any value cost, relative values like 1 to 10.
You can also leave this column blank.
Adding conversion currency (Optional)
You can use this if you want to show your conversions in different currencies or you have multiple accounts with transactions in different currencies.
Few things to keep in mind
- When importing data, make sure to add customer information correctly. Because once imported it cannot be removed or edited.
- When you upload the spreadsheet to Google, you can see your mistakes by downloading your errors in the same file format.

- Don’t add another row to measure your personal preferences. It may fail to upload it.
Conclusion
I hope this guide could give insights into the most important steps to start your offline conversion tracking.
Of course, there can be more steps to customize it even further, and if you want, you can learn about them from Google’s support page.
Other than that, you can create, test, and import your offline conversion actions resulted from your Google ads.
What other steps you think can be added?
Let me know in the comments section below…
For any help with your Google ads management, you can contact me through the Contact page.